How do I cluster Liferay with Terracotta?

That’s a question I’ve head many times and in this post I will show you just how to do that. These instructions are for Liferay 6 CE GA3 Tomcat 6.0 bundle however you can use any app server supported by Terracotta but the location and some configuration might be slightly different. So to get started you need to download:
Next step is to install Liferay and Terracotta. For the purposes of this post I won’t go into great detail with the installation as both Terracotta and Liferay has good documentation. Basically the installation consist of unpacking the packages to a directory. From now on I will refer to those locations as LIFERAY_HOME and TERRACOTTA_HOME and inside LIFERAY_HOME we will have tomcat directory which I will refer as TOMCAT_HOME. Normally you would also install Liferay and Terracotta in separate servers but I will post a separate post addressing the recommended architecture. For now we can install everything on the same machine and run Terracotta with default configuration for development purposes.
Normally when clustering Liferay you need to address following components: EhCache and Hibernate, Quartz Scheduler, Document Library, Search Engine and optionally Session Replication. For Document Library and Search Engine Terracotta doesn’t offer anything new so you make those centrally available the same way as before. For example SAN for DL and SOLR for Search and Indexing. So we are left with EhCache and Hibernate, Quartz and Session Replication that we can address with Terracotta.
EhCache and Hibernate Second Level Cache
- Remove ehcache.jar that is bundled with Liferay (located in TOMCAT_HOME/webapps/ROOT/WEB-INF/lib)
- Copy all jars in TERRACOTTA_HOME/ehcache/lib to TOMCAT_HOME/webapps/ROOT/WEB-INF/lib
- Copy TERRACOTTA_HOME/common/terracotta-toolkit-1.0-runtime-<version>.jar to TOMCAT_HOME/webapps/ROOT/WEB-INF/lib
- Create my-ehcache folder to TOMCAT_HOME/webapps/ROOT/WEB-INF/classes
- Create a hibernate-terracotta.xml and a liferay-multi-vm-terracotta.xml.
- Adjust terracottaConfig in hibernate-terracotta.xml and liferay-multi-vm-terracotta.xml to point to your Terracotta servers. Like this: <terracottaConfig url=”localhost:9510″/>
- Add following properties to your portal-ext.properties file:
ehcache.multi.vm.config.location=/my-ehcache/liferay-multi-vm-terracotta.xml

net.sf.ehcache.configurationResourceName=/my-ehcache/hibernate-terracotta.xml

hibernate.cache.region.factory_class=net.sf.ehcache.hibernate.EhCacheRegionFactory
Quartz
- Remove quartz.jar that is bundled with Liferay (located in TOMCAT_HOME/webapps/ROOT/WEB-INF/lib)
- Copy TERRACOTTA_HOME/quartz/quartz-terracotta-<version>.jar and quartz-all-<version>.jar to TOMCAT_HOME/webapps/ROOT/WEB-INF/lib
- Add following properties to your portal-ext.properties:
org.quartz.jobStore.class = org.terracotta.quartz.TerracottaJobStore

org.quartz.jobStore.tcConfigUrl = localhost:9510
- Extract portal.properties from portal-impl.jar and place it in TOMCAT_HOME/webapps/ROOT/WEB-INF/classes
- Comment out following properties in portal.properties
#org.quartz.jobStore.dataSource=ds

#org.quartz.jobStore.isClustered=false

#org.quartz.jobStore.misfireThreshold=60000

#org.quartz.jobStore.tablePrefix=QUARTZ_

#org.quartz.jobStore.useProperties=false
Session Replication
This is highly container specific so refer to Terracotta documentation for specific instructions. Following steps are for Tomcat 6.0.
- Copy TERRACOTTA_HOME/sessions/terracotta-session-<version>.jar to TOMCAT_HOME/lib
- Copy TERRACOTTA_HOME/common/terracotta-toolkit-1.0-runtime-<version>.jar to TOMCAT_HOME/lib
- Edit TOMCAT_HOME/conf/Catalina/localhost/ROOT.xml and add following line right after <Context>
<Valve className="org.terracotta.session.TerracottaTomcat60xSessionValve" tcConfigUrl="localhost:9510"/>
Testing The Configuration
Testing your configuration is simple:
- Startup your Terracotta Server
TERRACOTTA_HOME/bin/start-tc-server.sh
- Startup your Tomcat
TOMCAT_HOME/bin/startup.sh
- Before Tomcat has fully started you should see following lines in your Tomcat console log:
2010-09-01 21:35:40,059 INFO - Terracotta 3.3.0, as of 20100716-140706 (Revision 15922 by cruise@rh5mo0 from 3.3)
2010-09-01 21:35:40,566 INFO - Successfully loaded base configuration from server at 'localhost:9510'.
- Now browse http://localhost:8080 to verify that your portal is running.
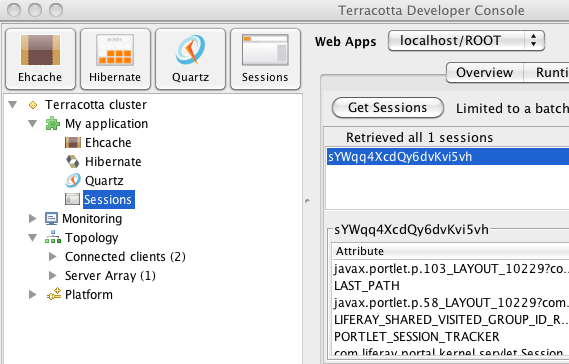
- Now launch Terracotta Developer Console to verify that EhCache, Hibernate, Quartz and Sessions are seen by Terracotta. You can launch dev console with following command:
TERRACOTTA_HOME/bin/dev-console.sh
- Once you are connected to your Terracotta you should see Ehcache, Hibernate, Quartz and Sessions under My application which indicates that all of them are connected and recognized by Terracotta. Now you can use Dev Console to see what’s inside your cache or session
Closing Remarks
Now as you can see it is quite easy the cluster Liferay with Terracotta express installation. Now if you want to use the DSO approach it is whole another beast as it involves tedious instrumentation. If you are a Liferay EE customer and want to get supported version of both Liferay and Terracotta contact your Liferay sales rep and ask about Liferay Terracotta Edition.
This post was originally published on Liferay blog.