Getting started with Liferay SAML 2.0 Identity Provider

Liferay 6.1 EE comes with SAML 2.0 Identity Provider and Service
Provider support via SAML plugin. If you are not familiar with SAML
check out my Introduction to SAML presentation slides.
In this post we will configure Liferay to be SAML Identity Provider
and configure Salesforce to be a Service Provider. After we are done
we have a user that can move from Liferay to Salesforce without
requiring to authenticate on Salesforce.
You’ll need following things to complete this by yourself:
* Liferay Portal 6.1 EE GA1 Tomcat bundle
* SAML Portlet WAR
* Salesforce developer account. You can sign-up here for free.
The first thing to do is download and install Liferay. If you need
help configuring Liferay refer to Liferay 6.1 User
Guide. Once that is done you’ll need to configure the SAML
identity provider before deploying the plugin. The IdP needs a private
and public key pair for signing SAML messages. It uses Java keystore
to store the them. We’ll create the keystore and they key pair
using keytool that is part of the JDK. You need to pick a unique
entity id for your IdP and a password that is used to protect keystore
and the private key. In this example we’ll use
liferaysamlidpdemo as the entity id and liferay as the password for
both keystore and the key. The keystore is created in
LIFERAY_HOME/data/keystore.jks as this is the default location SAML
plugin will look for it. You can also configure the location and type
of they keystore and will do it here just for reference.
2048 -keypass liferay -storepass liferay -keystore data/keystore.jks
You’ll be asked to provide some information that will be in
the certificate with the public key.
[Unknown]:
Liferay SAML IdP Demo
What is the name of your
organization?
[Unknown]: Liferay SAML IdP
Demo
What is the name of your City or Locality?[Unknown]:
What is the name of your State or
Province?
[Unknown]:
What is the two-letter
country code for this unit?
[Unknown]:
Is
CN=Liferay SAML IdP Demo, OU=Unknown, O=Liferay SAML IdP Demo,
L=Unknown, ST=Unknown, C=Unknown correct?
[no]: yes
Next step is to add SAML configuration to your portal-ext.properties.
saml.role=idp
saml.entity.id=liferaysamlidpdemo
saml.require.ssl=false
saml.sign.metadata=truesaml.idp.authn.request.signature.required=truesaml.keystore.path=${liferay.home}/data/keystore.jks
saml.keystore.password=liferay
saml.keystore.type=jkssaml.keystore.credential.password[liferaysamlidpdemo]=liferay
Now you can deploy SAML plugin by copying it to LIFERAY_HOME/deploy
and starting up tomcat. Wait for the saml-portlet to be deployed and
available and then open http://localhost:8080/c/portal/saml/metadata.
If you have configured everything correctly you should see the IdP
metadata similar to below. I’ve just shortened the data on
signature and certificate elements.
encoding=“UTF-8”?>
<md:EntityDescriptor
xmlns:md=“urn:oasis:names:tc:SAML:2.0:metadata”
entityID=“liferaysamlidpdemo”>
<ds:Signature
xmlns:ds=“http://www.w3.org/2000/09/xmldsig#”>
<ds:SignedInfo><ds:CanonicalizationMethod
Algorithm=“http://www.w3.org/2001/10/xml-exc-c14n#”/>
<ds:SignatureMethod
Algorithm=“http://www.w3.org/2000/09/xmldsig#rsa-sha1”/>
<ds:Reference URI=“”>
<ds:Transforms>
<ds:Transform
Algorithm=“http://www.w3.org/2000/09/xmldsig#enveloped-signature”/>
<ds:Transform
Algorithm=“http://www.w3.org/2001/10/xml-exc-c14n#”/>
</ds:Transforms><ds:DigestMethod
Algorithm=“http://www.w3.org/2000/09/xmldsig#sha1”/>
<ds:DigestValue>mVKz/Tv6o40+SrEF595+Gedmoo8=</ds:DigestValue>
</ds:Reference>
</ds:SignedInfo>
<ds:SignatureValue>AAJsDF8dJv5XQw6Ty1MSg7 …
OXvQw==</ds:SignatureValue>
<ds:KeyInfo>
<ds:X509Data>
<ds:X509Certificate>MIIDjjCCAnagAwIB…
</ds:X509Certificate>
</ds:X509Data>
</ds:KeyInfo>
</ds:Signature>
<md:IDPSSODescriptor
ID=“liferaysamlidpdemo”
WantAuthnRequestsSigned=“true”
protocolSupportEnumeration=“urn:oasis:names:tc:SAML:2.0:protocol”>
<md:KeyDescriptor use=“signing”>
<ds:KeyInfo
xmlns:ds=“http://www.w3.org/2000/09/xmldsig#”>
<ds:X509Data>
<ds:X509Certificate>MIIDjj
…</ds:X509Certificate>
</ds:X509Data>
</ds:KeyInfo>
</md:KeyDescriptor>
<md:SingleLogoutService
Binding=“urn:oasis:names:tc:SAML:2.0:bindings:HTTP-Redirect”
Location=“http://localhost:8080/c/portal/saml/slo_redirect”/>
<md:SingleSignOnService
Binding=“urn:oasis:names:tc:SAML:2.0:bindings:HTTP-Redirect”
Location=“http://localhost:8080/c/portal/saml/sso”/>
<md:SingleSignOnService
Binding=“urn:oasis:names:tc:SAML:2.0:bindings:HTTP-POST”
Location=“http://localhost:8080/c/portal/saml/sso”/>
</md:IDPSSODescriptor>
</md:EntityDescriptor>
Even though the IdP is configured and functioning it’s not
very useful because there’s no Service Providers configured. For
this example we are going to use Salesforce developer account to
demonstrate single sign-on between Liferay and Salesforce. If you
haven’t already signed up for Salesforce developer account do it here.
We’ll need to export the certificate from keystore because
Salesforce doesn’t know how to read SAML metadata.
-keystore data/keystore.jks -storepass liferay -keypass liferay
Now login to your Salesforce developer account in here. On your
dashboard click on Setup.
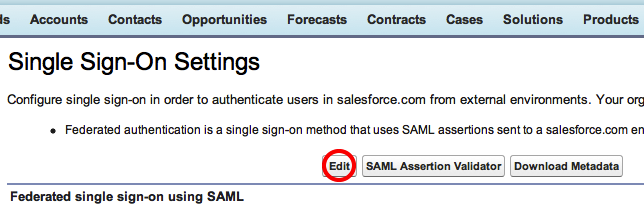
Then click on Security Controls > Single Sign-On
Settings under Administration Setup.

Then click on Edit.
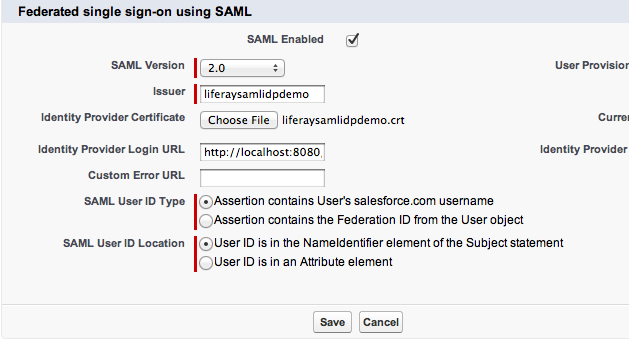
Here’s the setting you need:
* SAML Enabled.
* SAML Version: 2.0
* Issuer:
liferaysamlidpdemo (this is the entity id of the IdP)
*
Identity Provider Certificate: liferaysamlidpdemo.crt which you
exported earlier.
* Identity Provider Login URL:
http://localhost:8080/c/portal/saml/sso
* SAML User ID Type:
Select Assetion contains User’s salesforce.com username
*
SAML User ID Location: Select User ID is in the NameIdentifier element
of the Subject statement
* Identity Provider Logout URL:
http://localhost:8080/c/portal/logout (Salesforce does not support
SAML Single Logout Profile)
Verify that your setting as correct and then click on
Download Metadata. Also note the Entity Id as this will be needed on
the IdP side.

Move the downloaded metadata xml to
LIFERAY_HOME/data/saml/salesforce-metadata.xml. Now we need to
configure the IdP to know about this Service Provider. This is done by
telling saml plugin where to find the SAML metadata for Salesforce.
If your Salesforce Entity Id is not https://saml.salesforce.com
you’ll also need to add following lines to your
portal-ext.properties. Note I’m using
https://saml.salesforce.com as the entity id but you would replace it
with what ever Salesforce reported it to be.
saml.idp.metadata.attribute.names[https://saml.salesforce.com]=
saml.idp.metadata.name.id.format[https://saml.salesforce.com]=urn:oasis:names:tc:SAML:1.1:nameid-format:unspecified
saml.idp.metadata.salesforce.attributes.enabled[https://saml.salesforce.com]=true
If you had your tomcat still running just restart it so that the
new property value is read. Then login as [email protected] / test. Now
click on Manage > Site Pages. Click on Add Page. Add following values:
Name: Salesforce
Type: URL
URL: /c/portal/saml/sso?entityId=https://saml.salesforce.com

Notice the entityId is the same Entity Id that was shown as entity
id on the Salesforce Single Sign-On configuration page.
Go to Control Panel and add a new user with same email address as
your Salesforce developer account. Sign out and login with that new
account. Now click on the Salesforce page link. If everything was
configured correctly you are redirected to Salesforce and you are
signed in with your developer account. If you want to be redirected to
some other page than they home page you can add a URL parameter
RelayState with the page URL you want to be redirected to as the
value. For example the URL could look like this
/c/portal/saml/sso?entityId=https://saml.salesforce.com&RelayState=/006/o.
This would take me to my Opportunities page directly.
Now sign out from Salesforce and you will be taken back to Liferay
and logged out from Liferay. Now if you click on the Salesforce page
it will take present you with Liferay login page and after login will
take you to Salesforce.
Update: If you need to setup Liferay as SP check
out my collegues post Setting up Liferay as Service Provider.
This post was originally published on Liferay blog.